
How to Turn On Blockchain Verification for a Form in VerusTrust Forms
To turn on blockchain verification for a form in VerusTrust Forms, open the form in the builder, select the Settings button next to Generate with AI, switch on Supports Blockchain Entries, and select Save.
From then on, entries submitted through that form are prepared for blockchain anchoring: VerusTrust Forms records a cryptographic fingerprint of each entry on a blockchain, so anyone can later check that the record hasn’t changed since it was submitted.
Blockchain verification is available on every plan, including the free-forever one. A part of the VerusTrust Forms Help Center, this guide covers what the setting does, how to switch it on, and which forms need it most.
What Blockchain Verification Does
When an entry is verified, VerusTrust Forms creates a hash of it, a short fingerprint generated from the submitted data, and anchors that fingerprint on a blockchain inside a smart contract. The data itself stays off the public chain. Only its fingerprint goes on it.
If anyone changes the record later, even by a single character, it no longer matches the fingerprint on the chain. That makes every verified record tamper-evident: a change can’t be hidden.
Blockchain verification proves a record hasn’t changed since it was submitted. It doesn’t prove that what was entered was correct in the first place. Required fields, map accuracy checks and the right roles and permissions take care of that side.
Before You Start
To turn on blockchain verification, make sure you have:
- A form to verify. If you don’t have one yet, start with how to build your first form.
- Permission to edit forms. Your role needs Edit Forms set to Allow. See how to invite users and set roles and permissions.
Make sure to switch verification on before your team starts submitting, so every entry from the first one is covered.
Step 1: Open the Form in the Builder
Go to Forms in the sidebar and select Edit next to the form you want to verify. The form opens in the builder.
Step 2: Open the Form's Settings
At the top of the builder, select the Settings button. It’s the icon with three sliders, between Generate with AI and Cancel. The form’s Settings page opens.
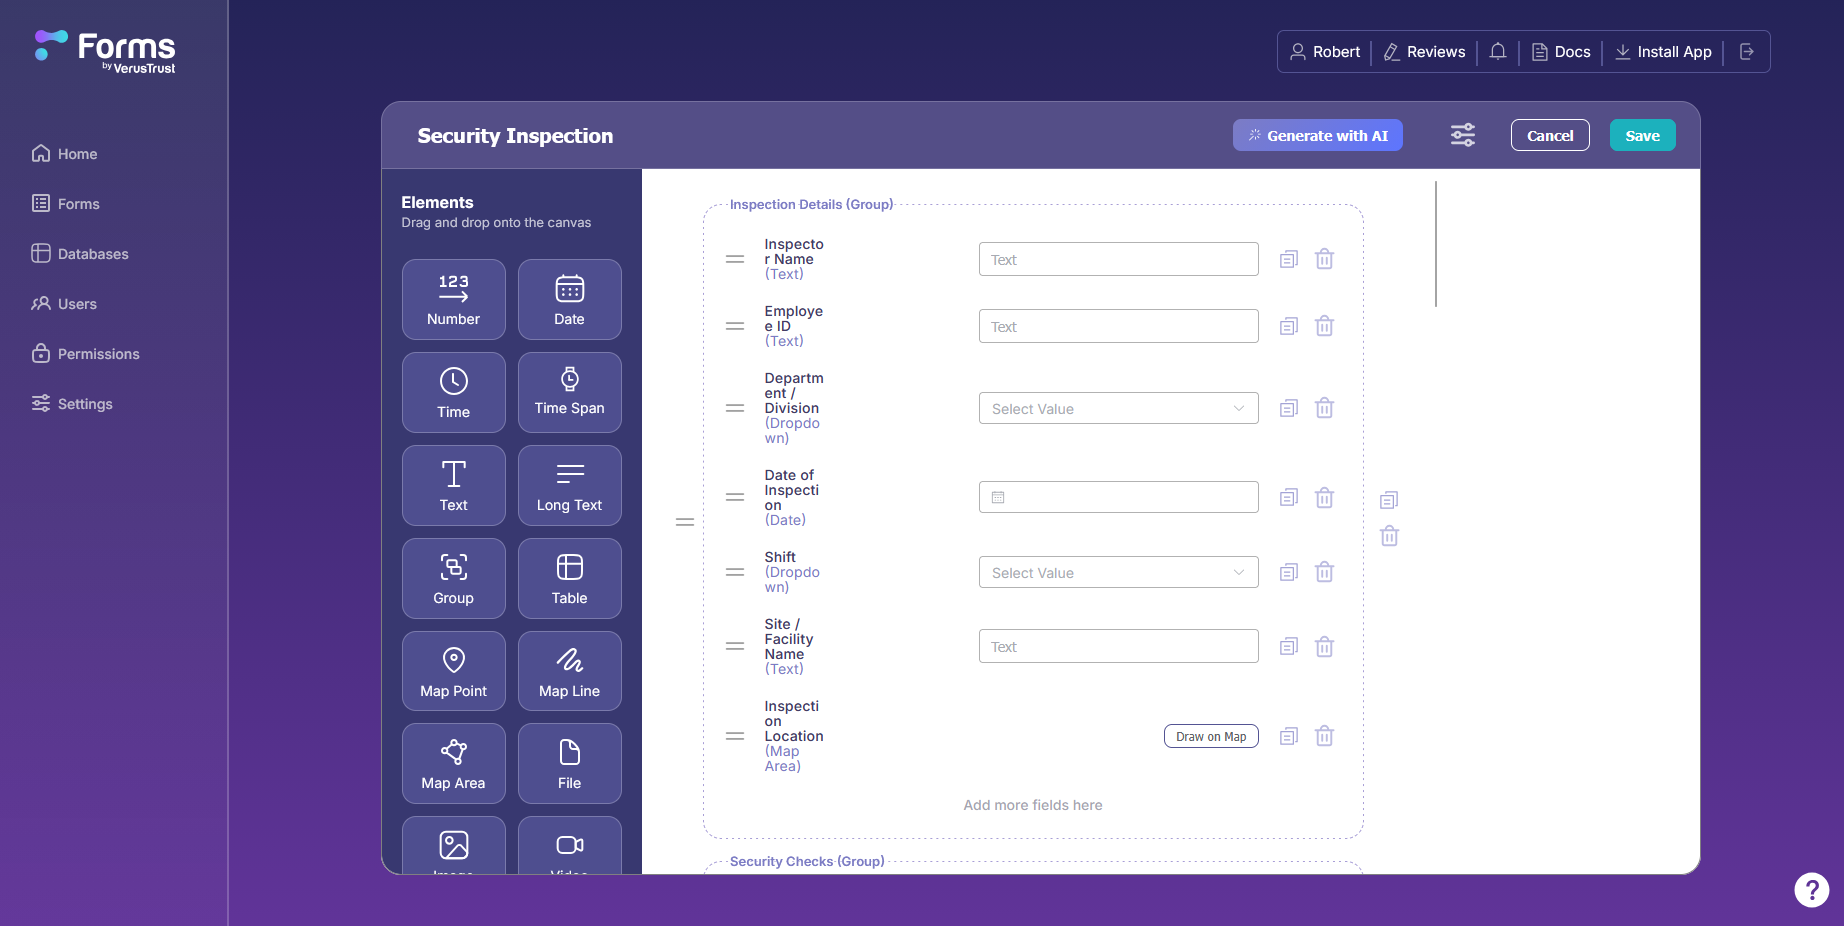
Step 3: Switch On Supports Blockchain Entries
Under Blockchain, switch on Supports Blockchain Entries. The switch turns teal when it’s on.
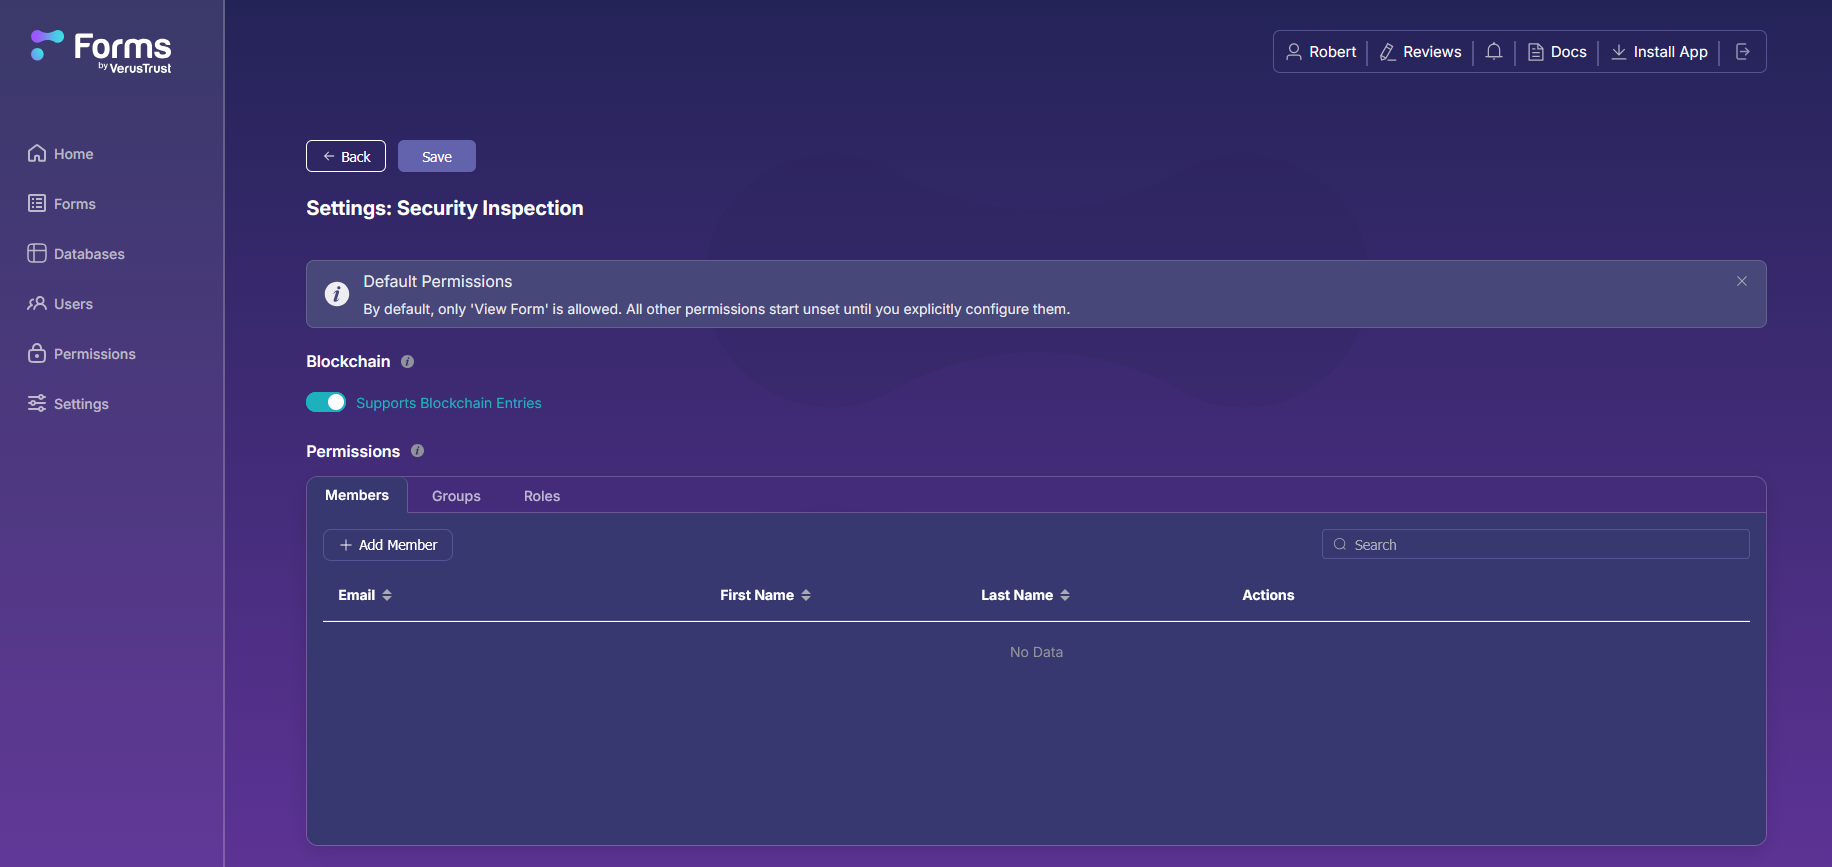
Step 4: Save the Setting
Select Save at the top of the Settings page, next to Back. Blockchain verification is now on for this form, and entries submitted through it are prepared for blockchain anchoring.
What Happens After You Turn Blockchain Verification On
- Nobody has to do anything extra. The person filling in the form submits it as usual. VerusTrust Forms handles the hashing and anchoring automatically.
- Entries collected offline are covered too. An entry can only be anchored once it reaches VerusTrust Forms, so entries saved on a phone with no signal are anchored after they sync. See how to sync submissions from the field.
- You can check a record whenever it’s questioned. How to verify a record that has been challenged walks through proving an entry hasn’t changed.
Which Forms Need Blockchain Verification Most
Turn verification on for any form whose records someone outside your team may need to trust later. Typical examples:
- Inspections and audits that a regulator, client or insurer may ask to see.
- Incident and safety reports that could end up in a dispute or a claim.
- Chain-of-custody records for samples, evidence or goods changing hands.
- Field data reported to funders or donors, such as monitoring and survey results.
Purely internal forms, such as a team’s daily checklist, usually don’t need it.
Also on the Settings Page: Form Permissions
The same Settings page controls who can access this form, with tabs for Members, Groups and Roles. Use Add Member to give a specific person access.
By default, only View Form is allowed, and every other permission stays unset until you configure it. For how roles and permissions work across your account, see how to invite users and set roles and permissions.
What to Do Next
If you’ve already figured out how to turn on blockchain verification with VerusTrust Forms, here’s what to do next:
- Verify a record that has been challenged when someone disputes an entry.
- Sync submissions from the field so offline entries reach VerusTrust Forms and get anchored.
- Export your data for reports and audits.
Frequently Asked Questions
Is my form data stored on a public blockchain?
No. Only a fingerprint of each entry goes on the blockchain. The data itself, including any personal details, photos or locations, stays in VerusTrust Forms.
Do field workers have to do anything to verify their entries?
No. Once Supports Blockchain Entries is on for a form, VerusTrust Forms handles verification automatically. Your team fills in and submits the form as usual.
Does blockchain verification prove my data is accurate?
It proves a record hasn’t changed since it was submitted. It can’t prove that what was entered was true. Pair it with required fields, location accuracy checks and the right permissions, so the data is right when it’s captured and provably unchanged after.
Does blockchain verification cost extra?
No. Blockchain verification is available on every plan, including the free-forever one. Each plan includes a set number of form per month. Beyond those, additional charges may apply.
If you haven’t signed up yet, start on the Free plan and switch it on for your first form.