
How to Add Advanced Field Types in VerusTrust Forms
To add an advanced field in VerusTrust Forms, open your form in the builder and drag a Table, Dropdown, File, Image, Video or map field from the Elements panel onto the canvas. Then select the field and set its rules in the Field Configuration panel: whether it’s required, which answers it accepts, and how many files it takes.
A part of the VerusTrust Forms Help Center, this guide covers each advanced field type, how to set it up, and the one rule to know before your form goes live: once a form has entries, you can add fields but not remove them.
Before You Start
You need a form open in the builder. If you haven’t made one yet, start with how to build your first form.
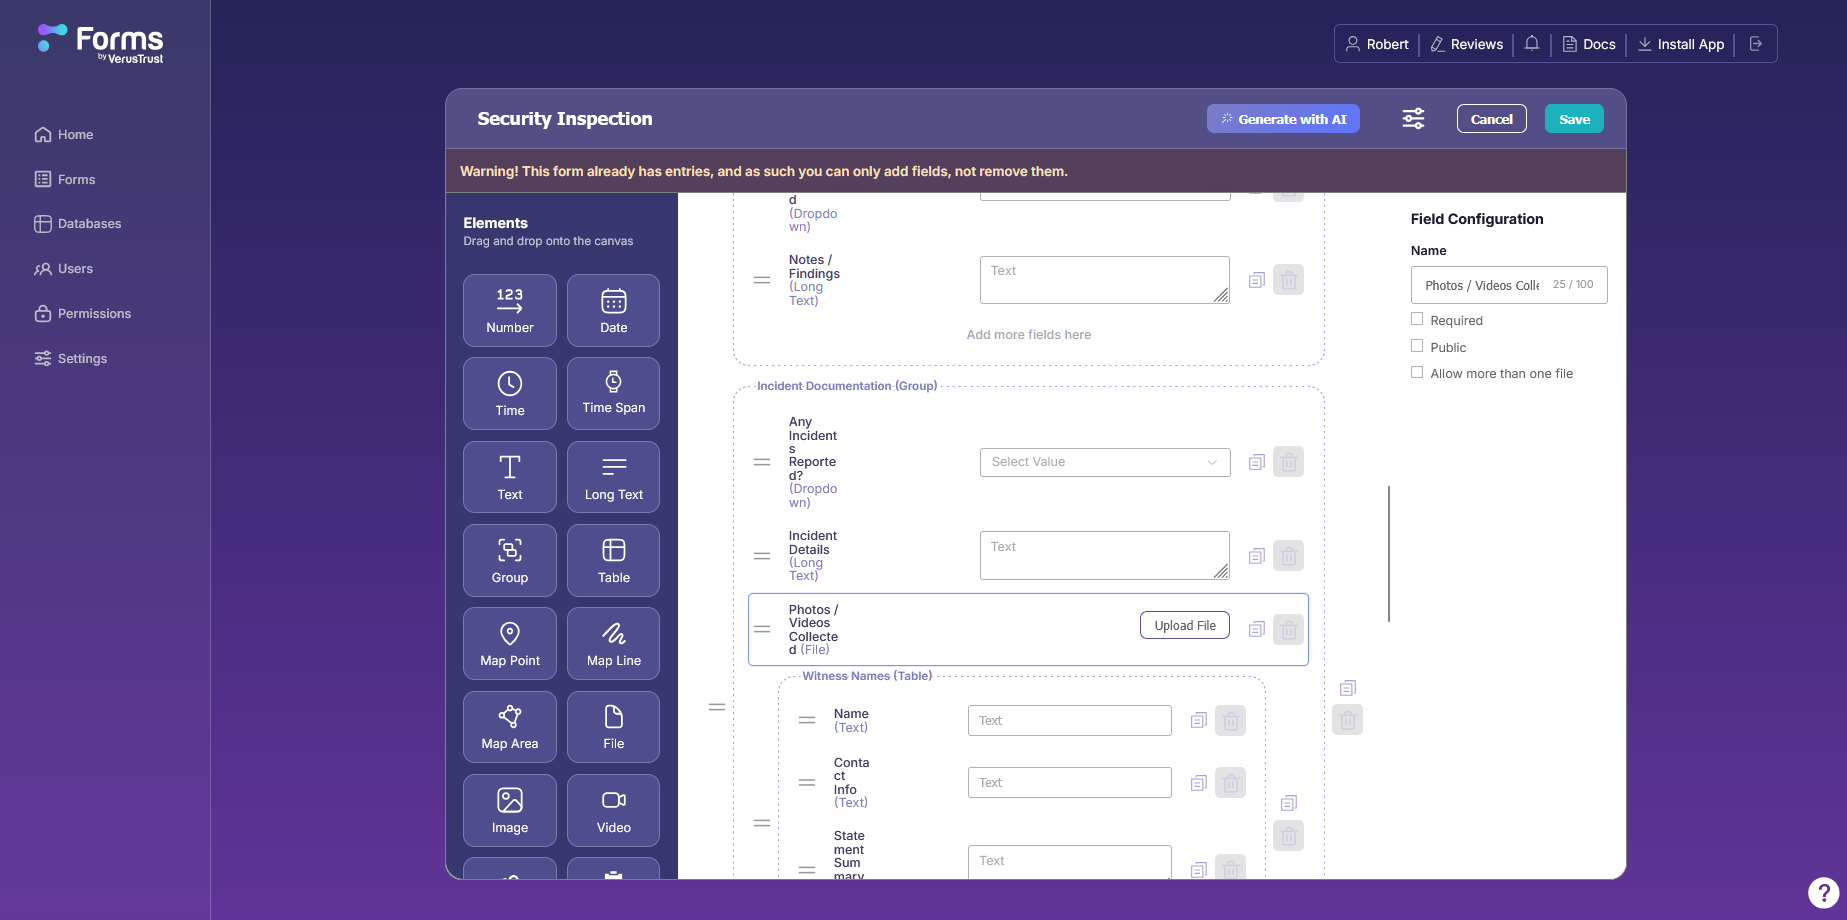
Plan your advanced fields before your team starts submitting. As soon as a form has entries, the builder shows this warning:
This form already has entries, and as such you can only add fields, not remove them.
You can keep adding fields after that point, but the delete icon on existing fields stops working.
Advanced Field Types at a Glance
These field types go beyond plain text boxes. Each one captures a specific kind of structured answer.
| Field Type | What it captures |
|---|---|
|
Table |
Repeating entries, such as one row per witness, per item checked, or per sample taken
|
|
Dropdown |
One answer from a list you set, with an optional Other choice
|
|
File |
Documents and other attachments, one or several per entry
|
|
Image / Video
|
Photo and video evidence from the field
|
|
Map Point / Map Line / Map Area
|
A location, a route, or a boundary drawn on a map |
|
Group |
A labeled section that keeps related fields together
|
|
User / Lookup
|
A person from your account, or a value from one of your existing datasets
|
Step 1: Choose an Advanced Field Type
Open your form with Edit on the Forms page. The Elements panel on the left lists every field type. The basic types sit at the top. Scroll down for Table, Map Point, Map Line, Map Area, File, Image, Video and the rest.
Drag the field onto the canvas and drop it where you want it, or on the Add more fields here area at the bottom of any group. Then select it to open its settings in the Field Configuration panel on the right.
The three map fields have their own guide: how to capture location with points, lines, and polygons.
Step 2: Add a Table for Repeating Entries
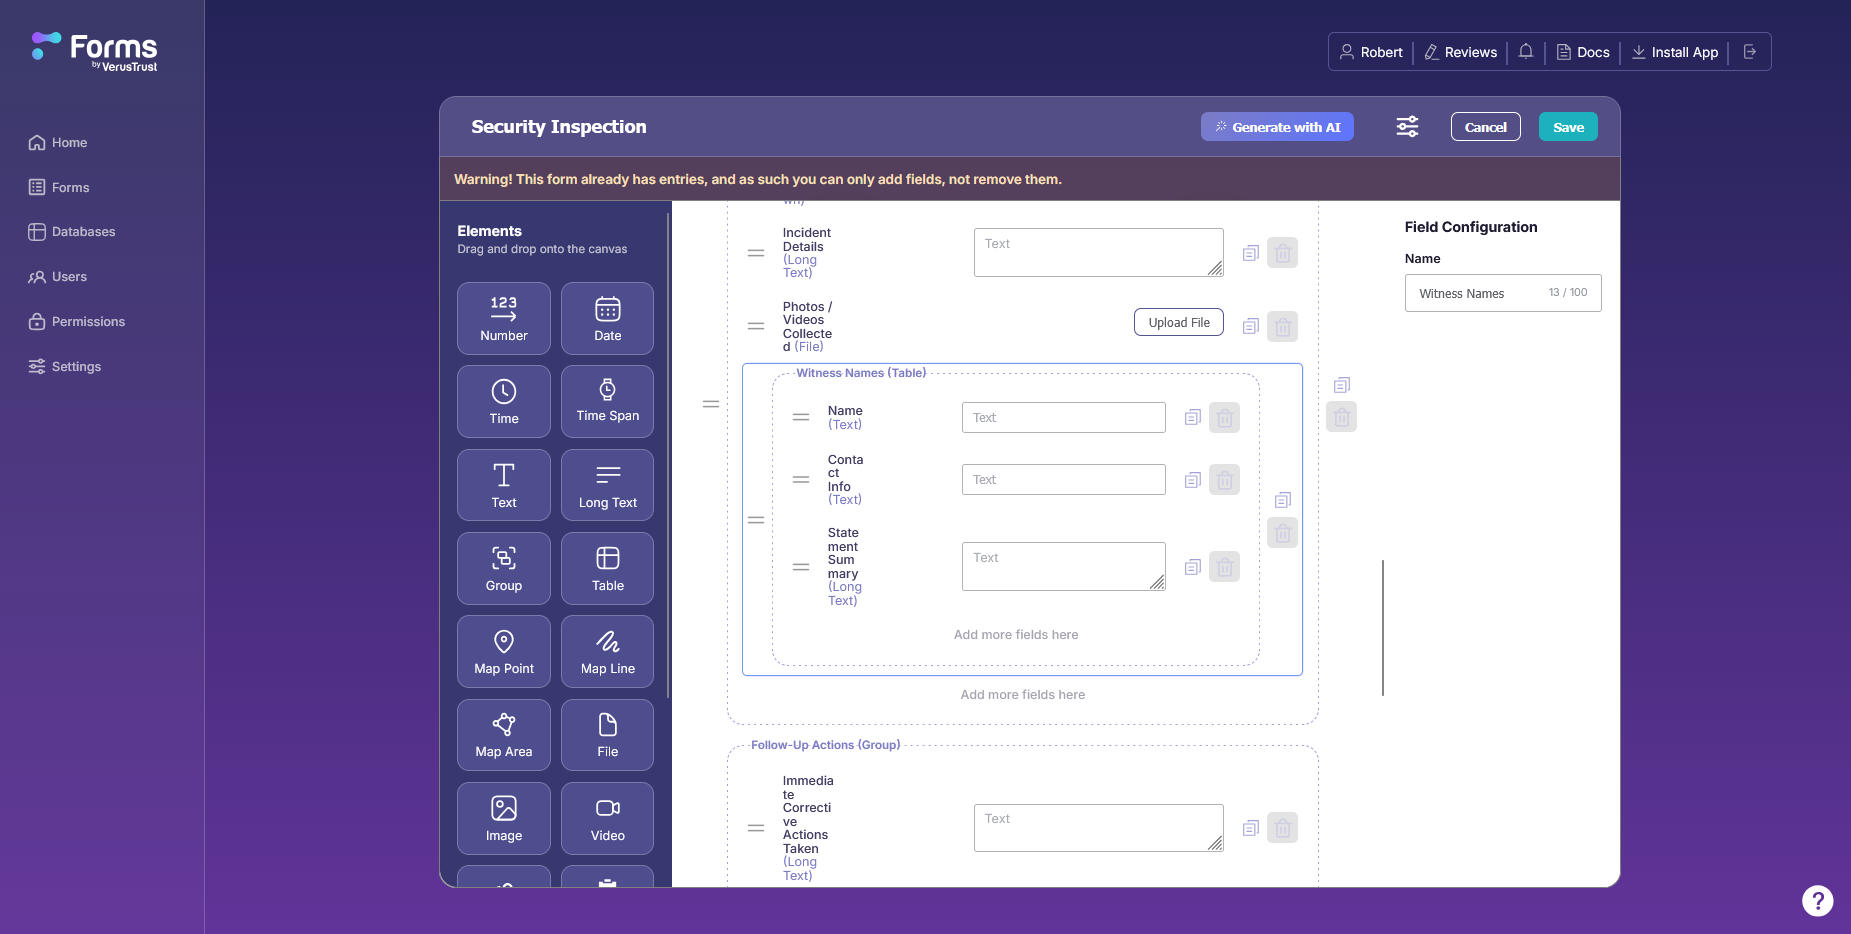
A table collects the same set of answers several times in one submission. An incident report might need a name, contact details and a statement from every witness, and nobody knows in advance whether there’ll be one witness or six.
- Drag a Table onto the canvas and give it a name, such as “Witness Names”.
- Drag fields into the table. Drop them on the table’s own Add more fields here area. Each field you add becomes part of every row, so a table with Name, Contact Info and Statement Summary asks for all three per witness.
- Set each field’s rules the same way you would outside a table: select it and use the Field Configuration panel.
The person filling in the form adds a row for each entry, so the table grows to fit what they find.
Step 3: Add Photos, Videos and Files
Use Image for photos, Video for video clips, and File for documents and other attachments. On the form, a File field shows an Upload File button.
By default, a File field takes one file. To let people attach several, such as a set of site photos or all the pages of a permit, select the field and tick Allow more than one file.
Attachments work offline too. Crews can add photos and files in the mobile app with no signal and sync them later. See how to install the mobile app and collect data offline.
Step 4: Add a Dropdown with Set Answers
A Dropdown limits an answer to options you choose, which keeps your data consistent. Twelve different spellings of “night shift” are no use in a report.
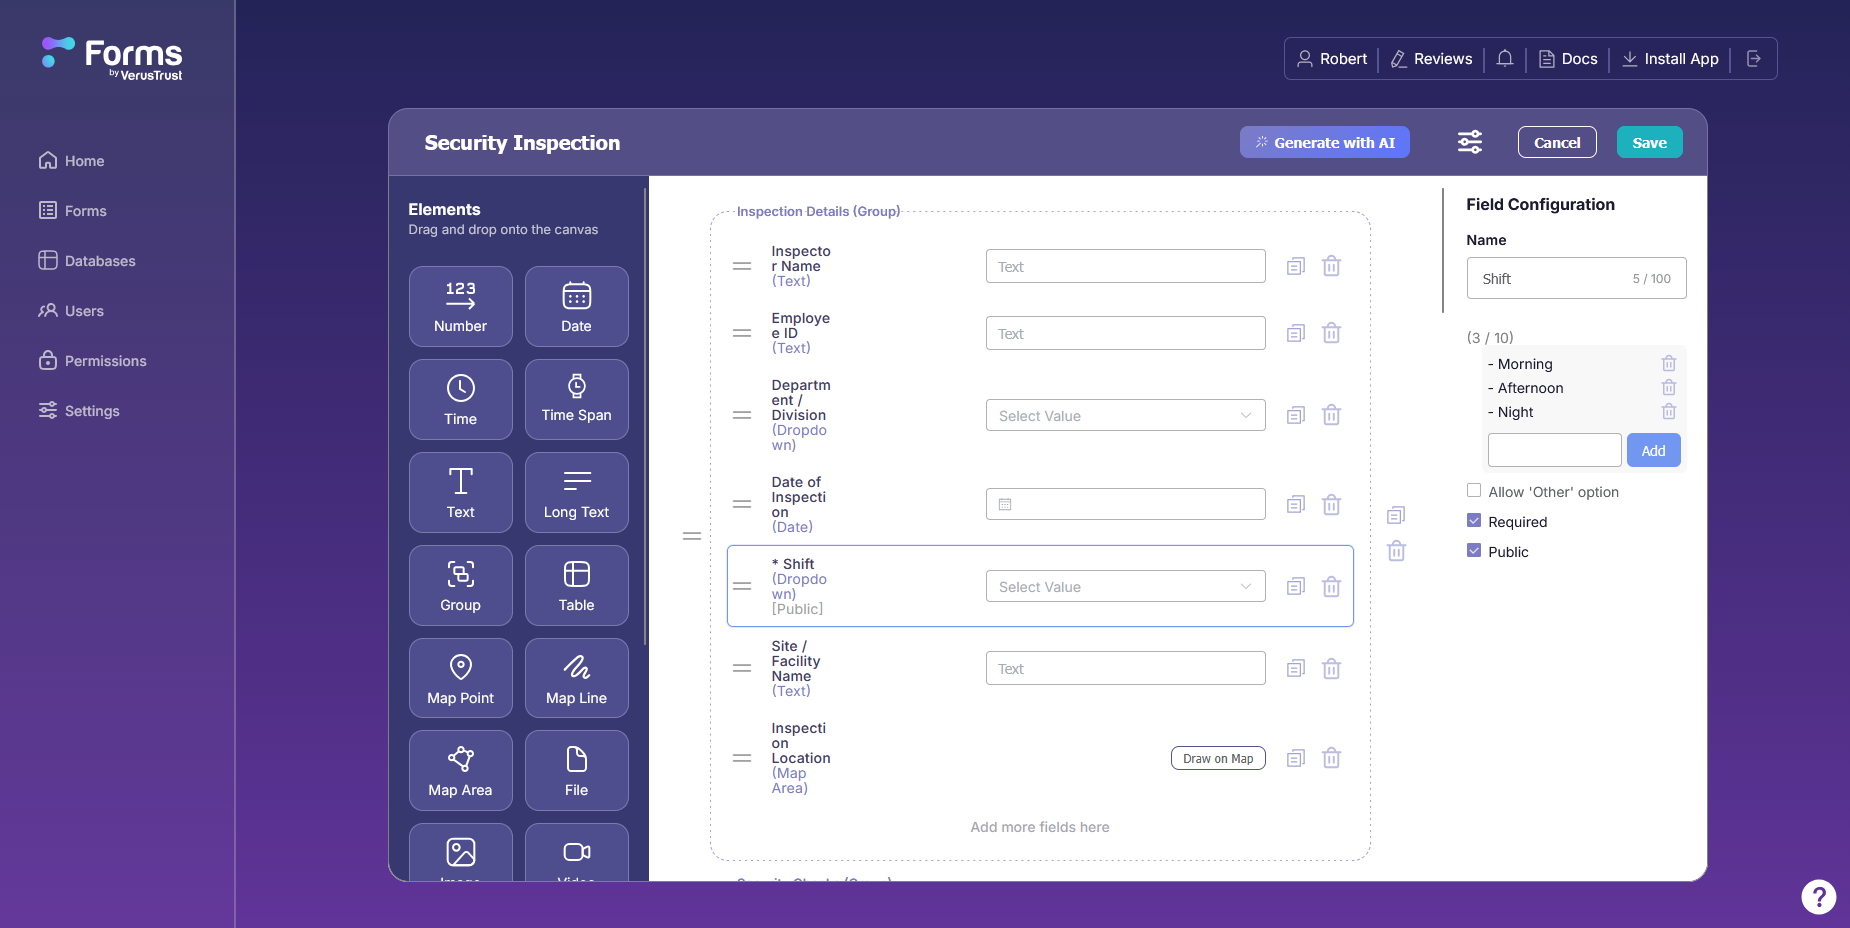
- Add options: type an option in the box under the list and select Add. A dropdown holds up to 10 options, and a counter such as 3 / 10 shows how many you’ve used.
- Remove an option: select the trash icon next to it.
- Allow ‘Other’ option: tick this to add an Other choice for answers that aren’t on your list.
Step 5: Set Validation Rules
Validation rules stop a form from being submitted with missing or out-of-range answers. You set them per field in the Field Configuration panel, and which rules appear depends on the field type.
| Setting | What it does | Where you'll see it |
|---|---|---|
|
Required |
The form can’t be submitted without an answer. Required fields show an asterisk (*) on the canvas.
|
Every field type
|
|
Default Value
|
Fills the field in advance. The person filling in the form can change it.
|
Text, Number and similar fields
|
|
Allowed options
|
Limits the answer to the options you’ve listed.
|
Dropdown |
|
Allow ‘Other’ option
|
Adds an Other choice to a dropdown.
|
Dropdown |
|
Allow more than one file
|
Lets people attach several files to one field.
|
File |
|
Public |
Includes the field in a blockchain smart contract, visible to the public.
|
Every field type
|
VerusTrust Forms applies these rules whenever someone fills in the form, on the web or in the mobile app, online or offline. A required field left blank in the field gets caught on the spot, before the entry syncs.
What to Do Next
- Turn on blockchain verification for the fields that need a tamper-evident record, such as a signed statement or an inspection result.
- Invite your team and set roles and permissions before anyone starts submitting.
- Export your data when you need your tables and attachments in a report.
Frequently Asked Questions
Why can't I delete a field from my form?
The form already has entries. Once anyone has submitted it, you can add new fields, but you can’t remove existing ones, and the builder shows a warning banner to say so. Build and test your form before your team starts using it.
How many options can a dropdown have?
Up to 10. The counter above the option list shows how many you’ve added. For longer lists, split the choice into two dropdowns, or tick Allow ‘Other’ option to catch the answers you didn’t list.
Can people attach more than one photo or file?
Yes. Select the File field and tick Allow more than one file in the Field Configuration panel.
Do advanced fields work offline?
Yes. Tables, dropdowns, attachments and map fields all work in the mobile app with no connection, and required fields are enforced offline just as they are online.
Are advanced field types included on the Free plan?
Yes. Every field type, from tables to map areas, is available on every plan, including the Free one. The plans differ in how many forms, devices and answers they include. If you haven’t signed up yet, start on the Free plan and add your first table today.